WebVPN
WebVPN offers clientless VPN access to an organization's internal websites and web applications through a browser, without any need of additional client software.
General Management
In the sections below, the network administrator will know how to manage the WebVPN service and install certificates.
To set up WebVPN:
- Click Synology VPN on the left panel, and go to WebVPN.
- Select Enable WebVPN.
- Specify the settings below:
- Custom WebVPN prefix: Enter a custom prefix for the VPN Plus web portal.
- Self-owned domain name: Click Edit to configure the Domain Setting.
- Self-owned domain name: Enter a registered domain name (e.g. vpn.company.com) to allow all its subdomains for WebVPN use:
- You need to create a wildcard DNS record (e.g. *.vpn.company.com) on the DNS server. Incoming traffic to the domain and subdomains will be directed to the $_DSPRODUCTNAME_$ for WebVPN access.
- Make sure the $_DSPRODUCTNAME_$ is suitable for handling traffic to the specified domain via WebVPN.
- HTTPS port: Specify the port for WebVPN access over HTTPS.
- Active licenses: See how many active licenses for the premium features are installed. To add licenses, go to License on the left panel.
- Detect webpages with mixed contents: Detect if a webpage is identified by your browser to have mixed HTTP and HTTPS contents. Since WebVPN uses secured HTTPS connection, the webpage's HTTP contents may not display properly.
- Click Apply to finish the setup. A customized URL for the VPN Plus web portal will then appear for use.
Note:
- To set up WebVPN using the Synology DDNS service, see this article.
- Enabling Detect webpages with mixed contents will affect the general WebVPN speed.
- To always properly display HTTP contents in a detected mixed-content webpage, you can add these contents as WebVPN portals.
To install a third-party certificate to the $_DSPRODUCTNAME_$:
The network administrator can purchase a wildcard certificate from a trusted third-party and install it to the $_DSPRODUCTNAME_$. After installation, all clients can smoothly access the WebVPN service without seeing browser alerts.
- Go to SRM Control Panel > Services > Certificate.
- Under the Action section, click Import certificate.
- Click Browse and provide the acquired private key and certificate.
- Click OK to finish the import.
To install the $_DSPRODUCTNAME_$ certificate to local devices:
If no trusted third-party certificate is available, the network administrator can create a self-signed certificate from the $_DSPRODUCTNAME_$, and install it to all client devices.
- Go to SRM Control Panel > Services > Certificate.
- Under the Action section, click Create certificate > Create self-signed certificate. Follow the wizard's instructions to create a certificate for the VPN Plus web portal.
- Under the Server certificate section, click Export certificate to download the self-signed certificate.
- Share this certificate with local users. Ask them to install it to their devices as instructed in the Usage Guide.
To manage WebVPN portals:
After WebVPN is enabled, the network administrator can manage this service and its portals. These portals can show up on the WebVPN page for easy access to websites.
- Click Synology VPN on the left panel, and go to WebVPN Portals.
- Manage WebVPN portals in ways below:
- To add a portal: Click Add and specify relevant settings:
- Show in default portals: Select to show this portal as a default portal to designated users.
- Customize portal alias: Select to customize an alias for this portal for identification.
- To edit a portal: Select a portal and click Edit to make relevant changes.
- To remove a portal: Select a portal and click Remove.
To manage the address bar privilege:
The address bar is a convenient tool that allows normal users to visit websites not listed as portals. The network administrator can determine whether it is open to access from all/specific users and groups.
- Click Synology VPN on the left panel, and go to WebVPN Portals.
- Click Settings.
- To allow users access to the address bar, select Allow users to connect to web resources via the address bar.
- Specify which users/groups are allowed to use the address bar.
- Click OK.
- The address bar will appear to allowed users/groups when they use WebVPN.
Note:
- Through the address bar, allowed users/groups can reach all web resources behind this $_DSPRODUCTNAME_$. To avoid undesired access, check and modify the permission settings at Permission > Block List.
To customize text replacement rules:
You can set up custom rules to replace specified texts by another ones. This helps to prevent incorrect display of some items on the visited websites.
- Click Synology VPN on the left panel, and go to WebVPN Portals.
- Click Custom Rule.
- Follow the steps below to customize text replacement rules:
- To add a custom rule:
- Fill in the fields above Source Text and Destination Text respectively.
Note: Any texts you put in the source text field will be replaced by the content in the destination text field.
- Click "+" to the right of the fields you just filled in.
- To edit a custom rule:
- Double-click on the source text or destination text of any existing rule to edit the content.
- Press Enter when you finish the modification.
- To delete a custom rule, click on the "X" to the right of such rule.
- When the setting is complete, click OK to save changes.
Note:
- The same source texts cannot be set in different rules.
- Usability of WebVPN may be affected by this function. Please contact Synology Support Team when you encounter any issues.
In the sections below, you will know how to use the WebVPN service to reach websites and set up your favorite portals.
WebVPN portals are quick entries to specific websites. You can manage your personal portals in ways below:
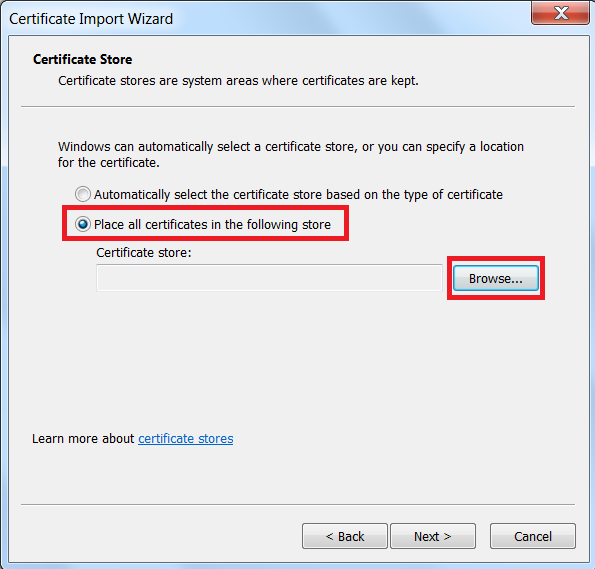
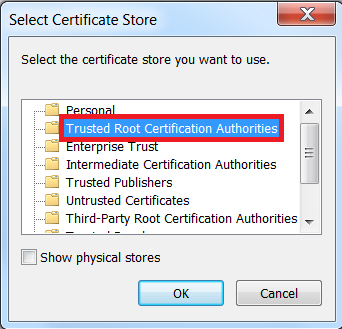
If no trusted third-party certificate is available on VPN Plus Server, you can download and install a self-signed certificate on your computer to avoid repeated browser alerts.
Follow the steps to install the certificate according to the computer platform.