Remote Desktop

Remote Desktop allows you to easily access and control the client desktops within the network under the $_DSPRODUCTNAME_$ from anywhere as long as you have Internet access, without further need of a client software.

General Management

To set up Remote Desktop:

  1. Click Synology VPN on the left panel, and go to Remote Desktop.
  2. Tick Enable Remote Desktop.
  3. Specify the settings below:
    • Self-owned domain name: Click Edit to configure the Domain Setting.
    • HTTPS port: Specify the HTTPS port for remote desktop connections. The default port is 9488.
    • Disallow duplicate logins: Tick to prevent accounts from creating multiple connections via this protocol.
  4. Click Apply to finish the setup. A customized URL for the VPN Plus web portal will appear for use.

To install a third-party certificate to the $_DSPRODUCTNAME_$:

The network administrator can purchase a certificate from a trusted third-party and install it to the $_DSPRODUCTNAME_$. After installation, all clients can smoothly access the VPN Plus web portal without seeing browser alerts.

  1. Go to SRM Control Panel > Services > Certificate.
  2. Under the Action section, click Import certificate.
  3. Click Browse and provide the acquired private key and certificate.
  4. Click OK to finish the import.

To install the $_DSPRODUCTNAME_$ certificate to local devices:

If no trusted third-party certificate is available, the network administrator can create a self-signed certificate from the $_DSPRODUCTNAME_$, and install it to all client devices.

  1. Go to SRM Control Panel > Services > Certificate.
  2. Under the Action section, click Create certificate > Create self-signed certificate. Follow the wizard's instructions to create a certificate for the VPN Plus web portal.
  3. Under the Server certificate section, click Export certificate to download the self-signed certificate.
  4. Share this certificate with local users. Ask them to install it to their devices as instructed in the Usage Guide.

Usage Guide

The sections below will guide you through how to use the Remote Desktop service to access the client desktops within the network of your $_DSPRODUCTNAME_$ from elsewhere.

To access a Windows desktop remotely:

Before you start:

  1. Make sure if the remote desktop feature is available on the version of Windows desktop you wish to access remotely. Here, we will take Windows 10 for example.
  2. On such Windows desktop, go to Control Panel > System and Security.
  3. Under System, click Allow remote access.
  4. In the Remote tab, select Allow remote connections to this computer, and then click OK.
  5. Back in Control Panel, click Allow an app through Windows Firewall under Windows Defender Firewall.
  6. Tick to allow Remote Desktop through the firewall, and then click OK.
  7. Go to Control Panel > Network and Internet.
  8. Under Network and Sharing Center, click View network status and tasks.
  9. Check out Network Connection Details and note down the IPv4 Address of this Windows desktop.
  1. Visit the VPN Plus web portal URL with a web browser. You may get the URL from the IT staff of your company or organization.
  2. Log in with your user credentials.
  3. Click Remote Desktop on the left panel.
  4. Click Create to add a remote desktop to access, and configure the following settings:
  5. Click Apply when the setup is complete.
  6. You will see the created remote desktop in the list. Click on such item to start the session.
    Note: You can also click on the gear icon to edit the settings, or the X button to delete the item.

To access a Mac desktop remotely:

Before you start:

  1. On the Mac desktop you wish to access remotely, go to System Preferences > Sharing, and then tick Remote Management.
  2. Note down the user credentials of such macOS which will be used for the remote access from VPN Plus web portal.
  1. Visit the VPN Plus web portal URL with a web browser. You may get the URL from the IT staff of your company or organization.
  2. Log in with your user credentials.
  3. Click Remote Desktop on the left panel.
  4. Click Create to add a remote desktop to access, and configure the following settings:
  5. Click Apply when the setup is complete.
  6. You will see the created remote desktop in the list. Click on such item to start the session.
    Note: You can also click on the gear icon to edit the settings, or the X button to delete the item.

To access a customized desktop remotely:

  1. Visit the VPN Plus web portal URL with a web browser. You may get the URL from the IT staff of your company or organization.
  2. Log in with your user credentials.
  3. Click Remote Desktop on the left panel.
  4. Click Create to add a remote desktop to access, and configure the following settings:
  5. Click Apply when the setup is complete.
  6. You will see the created remote desktop in the list. Click on such item to start the session.
    Note: You can also click on the gear icon to edit the settings, or the X button to delete the item.

To install a certificate to your device:

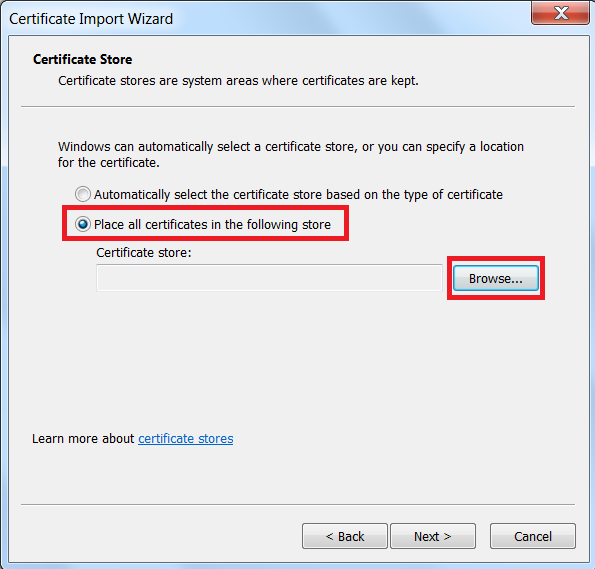
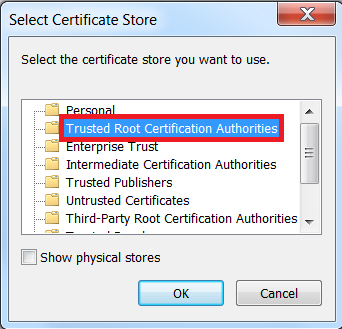
If no trusted third-party certificate is available on VPN Plus Server, you can download and install a self-signed certificate on your computer to avoid repeated browser alerts.

  1. Go to the VPN Plus web portal.
  2. Click the person icon on the top-right corner.
  3. Click Configurations.
  4. In the pop-up window, click Download to download the ca.crt certificate to your computer.

Follow the steps below to install the certificate according to the computer platform.

For Windows:

  1. Double-click the ca.crt file on your computer.
  2. Click Open > Install Certificate... > Next.
  3. Select Place all certificates in the following store.
  4. Click Browse and choose Trusted Root Certification Authorities.
  5. Click OK and follow the wizard's instructions to finish installation.
  6. Reopen the browser to make the certificate take effect.

For Mac:

  1. Double-click the ca.crt file on your computer.
  2. Select System for Keychain, and click Add.
  3. Enter the user credentials and click Modify Keychain.
  4. Open Keychain Access on your Mac computer.
  5. On the left panel, select System under Keychains and then select Certificates under Category.
  6. Find and double-click the certificate.
  7. In the pop-up window, click Trust, and select Always Trust for When using this certificate.
  8. Close the pop-up and follow the instructions to finish installation.